Today we're going to take a quick look at snares.
If you were to take the three most basic elements of a drum kit, the kick, snare, and hi-hat, you would quickly notice that each of them is playing in a different register. The kick hits in the low-end and the hi-hat is doing its funky thing up there in the high frequencies. While all of this is happening, the snare is played in the mid-range. The mid-range is where most of the music is happening, so snares usually need to be quite loud in order to come through the mix.
If you were to take the three most basic elements of a drum kit, the kick, snare, and hi-hat, you would quickly notice that each of them is playing in a different register. The kick hits in the low-end and the hi-hat is doing its funky thing up there in the high frequencies. While all of this is happening, the snare is played in the mid-range. The mid-range is where most of the music is happening, so snares usually need to be quite loud in order to come through the mix.
Snares are generally a short burst of mid-range rattle. On a traditional kit, this rattle is achieved by having beads or chains, called snares, stretched across the skin of a fairly high-pitched drum. The tighter the skin and chains, the shorter and snappier the snare gets. Loose chains result in a "washy" snare. Electronic snares have traditionally used some kind of noise oscillator to simulate this type of sound.
Most snare sounds are made up of two components, a tonal element, and a noise element. It's not absolutely necessary to have both but it helps a lot. A snare made purely out of noise tends to be a bit thin, and a snare made up of only a tonal element is kind of like a really high pitched tom and only truly works in a fairly minimal and empty mix.
There is no right or wrong here, and you can get almost endlessly creative with your snare sounds as long as you respect two simple concepts. First, it has to be in the mid-range. Low-mid, pure mid, high-mid...that's a matter of choice and should be just fine as long as it fits your mix. Second, the attack should always be short. It should snap into existence and start to fade right away. You can fade a snare in for effect, but that's not to mark the beats, that's just for added flavour.
So then. Let's look at some snares. Oh wait. I realize that in the last tutorials I wasn't as funny as usual, so...this guy walks into a store and asks if they have helicopter flavoured chips. The clerk says no sorry, we only have plain.
Alright, with that out of the way...snares.
Alright, with that out of the way...snares.
the NES snare
 Due to the fairly limited number of channels on the NES and the fact that each channel is locked to a specific waveform, synthesized snares on this machine tend to be made with only noise. Very rarely will a composer "waste" space on the pulse or triangle channels to add a tonal element to the snare. This probably explain why most people tend to use the PCM channel to play sampled snares instead. But back in the days, space was at a premium on cartridges and not many developers wasted that storage on samples until very late in the console's life. Pure noise snares tend to be really thin, and the only thing truly separating them from hi-hats is the length. For this reason, a lot of percussion tracks in NES soundtracks were made of only a few quick noise hits (often, only one) that would be played at varying pitches.
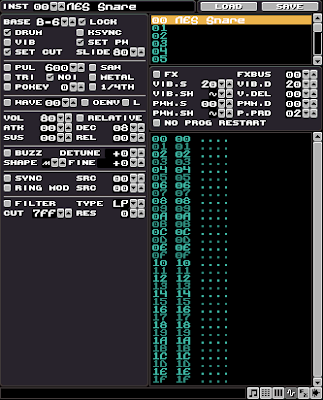
From a default instrument, simply lock the pitch anywhere from C5 and up (B6 in the example) and enable only the noise oscillator. Adjust the decay to whatever fits your need (08 in the example) and there you have it, the most basic of all synthesized snare sounds.
the C64 snare
 I remember so many games and demos from the C64 era that had these amazingly aggressive and punchy snares. The best way to describe them is that they initially play the tonal element for a very short time, then switch to pure noise for the fading part. To achieve this, we'll have to make some magic happen the in program editor.
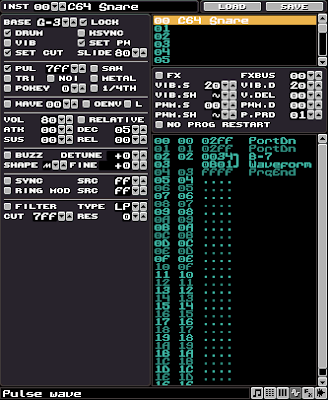
First lock your pitch at G3 and turn on your pulse oscillator and set it to pure square (7FF). Now turn on the Drum option and adjust your envelope to an ATK of 00 and DEC of about 05. And last setting to change is the program's P.PRD speed which should be set to 01. The rest of the sound will all be made in the program editor.
Since the Drum setting is on and we're using a square wave, the first thing that will happen when we trigger a note is a short noise burst (pitched at G3). This happens at the same time as our square wave starts playing. It will start on G3, then pitch down for two ticks at a speed of FF. This is what the first two rows (02FF) of the program do.
On the third tick, we want two things to happen simultaneously. We want to change the pitch up so that our noise element is clear and thin. We do that by entering a high note as if we were programming an arp. I chose 0034 here since it represents B7, the highest possible note. The next thing we want to do is cut the pulse wave off and replace it with the noise oscillator instead. This is achieved by using the Set Waveform command 0B01. This command is a binary command, and the numbers are expressed in hexadecimal. Since I don't feel like explaining it the right way, I'll explain it the dumb way: 0B00 is no oscillator, 0B01 is noise, 0B02 is pulse, 0B04 is triangle and so on with numbers 0B08, 0B10, and 0B20 all representing a specific oscillator. To activate more than one at the same time, you add the numbers. So to play the noise (01) and pulse (02) at the same time you would use the command 0B03. For saw (08) and wave (20) at the same time, the command would be 0B28. The status bar at the bottom will show you which waveform you are turning on so it should be easy to figure it out. So by entering 0B01 on the third row, we're setting the active waveforms to noise only, effectively cutting the pulse off at the same time.
Now that we have these two commands (0034 and 0B01) entered, we select the first one and press space to link them both together so they play on the same tick. The last command we input is FFFF which means the program will simply stop running once it reaches this point. And that's about all there is to making a C64 type snare.
the handclap
 While a clap is not really a snare per se, it usually serves the same purpose in a beat, and it's synthesized using pretty much the same techniques. Even if there is no drum skin being hit in an actual handclap, there is still a tonal element to it. You can experiment yourself by changing the 'cup shape' of your hands while clapping. The deeper the cup, the lower the clap sound. The noise element of a clap is usually made by the speed at which the hands are clapped and the room reverberation. So how do we simulate this with something as basic as Klystrack?
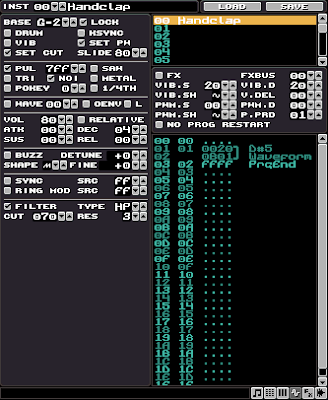
Start by locking your pitch at G2. Turn on both the Pulse (7FF) and Noise oscillators, and set your envelope to ATK 00 and DEC 04. Finally, adjust the P.PRD to 01.
In the program editor, skip the first row. This means that for the first tick both the Pulse and Noise will play unmodified at a pitch of G2. The two rows do pretty much the same thing as in the previous example. They will, on the same tick, change the pitch up, and let only the Noise oscillator play. This time I chose a lower pitch (0020) because claps are more meaty so we want to keep the noise's pitch lower than for a snare. Don't forget to link those two rows together, and end your program with an FFFF command.
Now if you play that you'll notice it's still quite similar to a snare. That's where we use the filter to finalize the sound into a clap. Turn on the filter and set it to HP, with a CUT of 70 and a RES of 03. This will cut a part of the low frequencies in the overall sound, and will introduce a peak in the low-mids because of the high resonance setting. And voila, a pretty damn convincing clap sound.
a few extra tips
using the filter
As you have seen with the clap sound, using the filter than totally change the nature of a sound. Using a high resonance HP filter with a low cutoff point will make your snare less bassy, and will add a bit more mid-range crunch to it. This can be used on almost any snare sound to make it pierce better in a thick mix, or if you want to add more separation between a low snare and a high bassdrum and ensure they don't step on each other in the mix.
Another thing I like to do is add subtle filter sweeping to snare sounds. I will usually use an HP filter and sweep it up a little (command 21xx) during the "fade" part of a snare. I use this to thin out my snare and make it seem a little shorter in the mix while retaining the highest frequencies.
two-stage envelopes
 While a lot of percussion sounds can be done quite well with a simple attack and decay envelope, you can get much more dynamic results by introducing the sustain phase of the envelope to percussions. The problem however is that normally to use a sustain, you have to also use the release and nobody in their right mind wants to have to trigger the release manually in the pattern data for every single drum sound. It's just a crazy fucking amount of work. You can work around it in two ways.
The most obvious is to use the Trigger Release command in the program editor. Simply enter command FC00 where you want the sound to move from sustain to release. While this is good and it works totally fine, I prefer to fade my sustain manually using 0Axx commands instead.
The big advantage of using two stages in your envelopes is that your decay will take the sound from full volume to the sustain value. By using a sustain value that is lower than full volume, you can use the decay part of the envelope to add a little short punch at the beginning of your sound, making it pierce a little more clearly in a mix. You will lose some overall volume on your instrument, but that can be compensated by moving its general volume above 80.
This can be used to add a sort of fake compression to your sound too. The decay part will represent the sound before the compressor kicks in, and the sustain part will represent the compressed sound. It can also be used for faking gated reverb effects, or add a reverse effect at the end of your snares. Experiment, it's a lot of fun and it adds a lot of personality to your instruments. Look at the example to see how it's done. Notice the sustain volume is set to 08, which is half the full volume.
end transmission
There we have it. A quick and dirty guide to basic snare sounds, hope you found it informative. And if not, then you can just eat a bag of dicks. Next tutorials, the hi-hats. Suggestions, comments and death threats in the little box thing at the bottom.
As you have seen with the clap sound, using the filter than totally change the nature of a sound. Using a high resonance HP filter with a low cutoff point will make your snare less bassy, and will add a bit more mid-range crunch to it. This can be used on almost any snare sound to make it pierce better in a thick mix, or if you want to add more separation between a low snare and a high bassdrum and ensure they don't step on each other in the mix.
Another thing I like to do is add subtle filter sweeping to snare sounds. I will usually use an HP filter and sweep it up a little (command 21xx) during the "fade" part of a snare. I use this to thin out my snare and make it seem a little shorter in the mix while retaining the highest frequencies.
two-stage envelopes
 While a lot of percussion sounds can be done quite well with a simple attack and decay envelope, you can get much more dynamic results by introducing the sustain phase of the envelope to percussions. The problem however is that normally to use a sustain, you have to also use the release and nobody in their right mind wants to have to trigger the release manually in the pattern data for every single drum sound. It's just a crazy fucking amount of work. You can work around it in two ways.
The most obvious is to use the Trigger Release command in the program editor. Simply enter command FC00 where you want the sound to move from sustain to release. While this is good and it works totally fine, I prefer to fade my sustain manually using 0Axx commands instead.
The big advantage of using two stages in your envelopes is that your decay will take the sound from full volume to the sustain value. By using a sustain value that is lower than full volume, you can use the decay part of the envelope to add a little short punch at the beginning of your sound, making it pierce a little more clearly in a mix. You will lose some overall volume on your instrument, but that can be compensated by moving its general volume above 80.
This can be used to add a sort of fake compression to your sound too. The decay part will represent the sound before the compressor kicks in, and the sustain part will represent the compressed sound. It can also be used for faking gated reverb effects, or add a reverse effect at the end of your snares. Experiment, it's a lot of fun and it adds a lot of personality to your instruments. Look at the example to see how it's done. Notice the sustain volume is set to 08, which is half the full volume.
end transmission
There we have it. A quick and dirty guide to basic snare sounds, hope you found it informative. And if not, then you can just eat a bag of dicks. Next tutorials, the hi-hats. Suggestions, comments and death threats in the little box thing at the bottom.
