
For the second "tutorial", we'll be looking at the instrument page and what every option means. I put tutorial in quotes because this is turning out to be more of a user manual than an actual how-to, but I really want to cover all the options before we start with the tutorial-y part of the tutorials.
Klystrack's synthesis engine is a mixture of C64, Amiga and Atari ST in that it does most/all of what these computers were famous for. People that are already familiar with chip tracker synthesis should feel right at home in this screen, but people used to traditional synths might find it a little awkward since all the options are scattered across the screen in a strange order and some have weird names.
Klystrack's synthesis engine is a mixture of C64, Amiga and Atari ST in that it does most/all of what these computers were famous for. People that are already familiar with chip tracker synthesis should feel right at home in this screen, but people used to traditional synths might find it a little awkward since all the options are scattered across the screen in a strange order and some have weird names.
top bar and list
 |
| "Inst" is secret coded language, it really means "instrument". I know right? |
Alright, let's dive in. The first thing you'll see on the instrument screen is the top bar, and the instrument list. On the left side of the top bar you have up/down buttons that are used to pick which instrument is currently selected for editing. Next you'll have this big empty space in which you can click to enter a name for that instrument. And at the very end of the bar on the right side, you'll have load/save buttons whose function I'm pretty sure you can figure out by yourself. Depending on how you work, you might want to save all your instruments in neatly categorized folders, or do like I do and always edit new instruments from scratch. Since chiptunes are somewhat limited in sound textures, having fresh instruments is one thing that will set you apart from the horde.
So go ahead and select instrument 00. When you select an empty instrument there will be this boring triangle wave sound as preset which you will invariable always want to change to something else. The first thing you should do after selecting which instrument to edit, is give it a name. The reason for this is that you don't want to have to scroll to your instrument list, triggering notes as you go, just to find that one sound you know you made just a few minutes ago. It will also help you not delete valuable instruments later on by thinking it's an empty slot. I don't think there's a limit to the number of characters you can put in there, or if there is one it's large enough to basically blog with. As such, I suggest you take the four seconds necessary to enter a descriptive name for each instrument. This will be a time saver later on when you're editing your song and selecting instruments directly from the main screen.
Now let's look at all the options available for creating sounds. I will separate them in five sections because of the way they are presented on screen, but just remember that a lot of these options were added in later versions and placed where ever there was some screen real-estate available. Eventually I'm sure they'll be reordered into something more sensible, at which point I will have to edit this tutorial, heh. I am also leaving out the FM part of the instrument panel for this tutorial. The FM section will get its own tutorial later down the road.
general settings
 |
| Note that saying "k'ync! vib vib k'sync!" out loud will summon Cthulhu. |
Base is the base note that will be played when you play a C. By default is it set to C-4 so when you input a C note in a pattern, it is actually a real C. If you need to transpose up/down to another pitch, then you can use the up/down button. If you move C-4 up to D-4, then when you enter a C in a pattern, it is in fact playing a real D. This semitone tuning is useful when you are dealing with samples that are at some random pitch, or when a combination of effects (ring, buzz, sync) actually pitch a sound to something else that a C. You can then use this to put the sound back in it's place to simplify your editing, knowing that when you see C in the pattern, it is a C. If you shift-click the up/down buttons, you will transpose by an entire octave instead.
Lock will lock the pitch of the instrument at the note indicated in Base. That means that no matter what note you input in a pattern with that specific instrument, it will always play at the same pitch. This is very useful for sounds whose pitch you want to remain stable throughout a song, such as a kick or a snare.
When the Drum setting is on, as it is by default, your instruments will have this very short noise sound played at the beginning. This is a classic chiptune trick to add some "snap" to sounds, especially percussion instruments. Historically this was done by hand in the instrument's program, but since it's such a common thing to do, klystrack offers you an option for it directly instead. You can still do it the oldschool way by turning oscillators on/off in the program if you prefer to do everything by hand. Note that the noise that is played is actually this instrument's noise oscillator, and will thus be subjected to all the pitch/ring/sync settings you have going on. If you have Drum turned on, and are using the Noise oscillator at the same time, it will not stack since it's the same source being played.
Ksync is short for Key Sync. What that means is that every single oscillator for this instrument will be restarted from the beginning every time a new note is played. That includes all the audible oscillators, as well as the LFO used for the buzz effect. When you have it on, you will be assured that your instruments always sounds the same when it is triggered in a pattern. If you leave it off, then the oscillators will be free and that will introduce unpredictable variations over time. Both settings are useful depending on your needs. Using the buzz effect on an instrument can sometimes introduce some kind of "slow movement" in your sound and you might want to have this flow freely, independently from the notes you trigger. In that case, leave Ksync off. And for those moments when you want to make sure each note triggers perfectly the same way all the time, turn this baby on.
The Vib button will turn vibrato on and off for this instrument. You will remember something similar from the last tutorial and it is indeed the exact same setting. If you leave this setting off in the instrument, then you can turn it on/off at will directly from patterns. Note that if you turn it on from a pattern, it will remain on for the duration of that note. If you turn it on however, the pattern's vibrato control bit will actually turn the vibrato off but only for rows where the bit is set. This might seem like an odd choice, and hell it might even be a bug, but it gives you amazing control over vibrato effects straight from the pattern. There are more settings for the vibrato effect, such as depth, speed and delay, but these are in another panel so we'll get to them a bit later. I wasn't kidding when I said the options are all over the place!
Set PW actually means Reset Pulse Width Modification. If your sound is made out of a pulse wave (getting to that very soon) when you can have the duty cycle of the pulse wave be modified by a dedicated LFO whose speed, shape, and depth can be, again, set in another panel. By default this LFO is free flowing and will not reset with new notes, giving your sound a very organic movement over time. If you'd like your sounds to always restart from the same pulse width however, you can turn this on. This entire function is however a bit wonky and I would suggest leaving it on most of the time or you will risk having the pulse width go out of range and your notes will briefly disappear when it gets too high.
The Set Cut function is very similar. This will Reset the filter's Cutoff on each new note. Klystrack as a multimode resonant filter included and this option will simply make sure that every time a new note is triggered, the filter's cutoff will be reset to what is selected in the filter section. In most cases you will want to have this on for general purpose instruments. But if you are looking to make long filter sweeps over a large selection of notes, having it off will be more useful as you can set pattern effects to "slide" the cutoff up or down by discreet amounts. Note that the Set Cutoff pattern effect will always override this, meaning that you can have a general cutoff setting for most of your notes, but if you want to change the cutoff for a specific note, then the pattern effect takes priority over the instrument's filter settings.
The last option in this panel, Slide represent the speed at which note will slide to new pitches when the slide control bit is used in a pattern, as seen in the previous tutorial. The high the value, the faster the new note will slide from the last note's pitch to its own. Note that this is a relative "pitch speed" and not a "pitch over time" effect so the longer the interval between two notes, the longer it will take to slide from one to another regardless of this setting. If you'd rather have your notes slide from one note to another in a set period of time instead, you will have to get creative with pattern effects, and we'll get to that later in another tutorial.
oscillators
 |
| Oscillators for everyone! Get'em while they're hot. |
The PUL button turns on the Pulse oscillator. The three digits next to it represent its duty cycle. The lower the number, the "thinner" your sound will get, and the higher you set it the closer you get to a perfect Square wave (7FF). This oscillator also has extra settings known as Pulse Width Modification, which is found in another panel and will be addressed later.
Saw and Tri basically turn the Sawtooth and Triangle oscillators on and off. The Sawtooth is a bit less "electronic" than the Pulse and is usually used for smoother textures. The Triangle waveform is something that sounds somewhat between a pure Square (harsh) and a Sine (very very smooth). If you've ever played a NES game in your life, this is usually the waveform used for basslines and flute-like sounds.
The Noise oscillator is a basic white noise. However, contrary to most traditional synths where the white noise is always the same no matter which pitch it's being played at, the noise in klystrack varies with pitch. The lower the pitch (the Base option in the general settings) the darker it will sound, and as you go up in pitch, the brighter it will be. This is incredibly useful for percussive sounds with a snare sounding best with a mid-pitch noise whereas hihats will definitely sound better and the maximum pitch.
The Metal button will instantly make every song you make into a remix of Iron Maiden's Run To The Hills. However it is not yet fully implemented so for the moment, what it actually does is add a sync effect to your noise, effectively turning it into a very harsh noise-like, but tonal oscillator. Unfortunately doing so will also drive the pitch slightly between tones and it's not really possible at the moment to bring it back in tune with the rest. This is somewhat of a bug and I am sure it will be fixed in later versions. For the moment, it remains useful for hash percussive sounds that do not need to by in tune with the song.
Pokey is a mystery to me. It is some kind of emulation of a specific Atari ST function that entirely escapes me. Suffice to say it will produce extremely glitchy sounds that defy the laws of pitch. Every note will trigger some different unpredictable bleep. You can select 16 variations of those bleeps. Might be useful for percussive sounds and weird sound effects but there's not much musicality you will obtain from this.
The 1/4th button will simply make all your oscillators play at a quarter of the pitch. This can be useful for bass sounds, but is best used on "silent instruments" to act as LFO for ring/sync effects. This will get clearer in a later tutorial and is a bit outside the scope of the current one. For now though, suffice to say it plays your sounds at a quarter of the pitch, so much much lower.
Wave will use a sample as oscillator. Samples are loaded, generated or even hand-drawn from the Wave Editor screen and then selected in the Instrument Editor. By default an instrument is set to wave 00, meaning that if you activate this oscillator, it will use the sample located at position 00 in the Wave Editor screen. You can change that to any of 128 available wavetable position using the up and down arrows. There is technically no difference between using one of the oscillators, or a wave. The selected sample will be used as if it was one of the oscillators and get processed the same way. Instead of loading an external sample, you can also generate a basic Sine wave directly from the Wave Editor meaning that you can use it as just another pure oscillator if you want. The ability to then draw variations with the mouse directly on the wave itself means that you have access to tons of textures that would not normally be available.
Turning 0Env on means that the sample will not be processed by the volume-based modulation. That means it will bypass the volume envelope, the buzz effect, and the ring modulator. Filter, sync and vibrato will still affect the sample normally.
The L button is to lock the pitch of a wave. The frequency at which the sample will be locked is dictated by the Rate option in te Wave Editor.
volume envelope
Each instrument in klystrack as its own ADSR envelope to modify how sounds are faded in/out and sustained. Each step in the envelope can be set to values ranging from 00 to 1F. The envelope is used to give movement and expression to your sounds.
Volume is pretty self explanatory. The default value is 80 and it can be adjusted from 00 to FF. It is good practice to keep your "full volume" sounds at 80 and not FF. That way if you need to bring softer instrument in front of the mix later, you'll have that much more headroom to achieve this.
The Relative button determines whether or not the volume and its envelope are absolute values or will be relative to the values in the volume and effect columns of your patterns. If it is left off, then entering a value of 40 in the volume column of your pattern will play the sound at an actual volume of 40. If Relative is turned on, then a value of 40 in the volume column would mean to trigger the sound at half the instrument's volume value. Remember from the last tutorial, the volume column values range from 00 (0% relative) to 80 (100% relative).
Atk determines the attack of the sound, which basically is how fast the sound will fade from nothing to its full volume. By default this is set to 01, which will pretty much play the sound instantaneously when a note is triggered. You can set it down to 00 for an even faster attack, but not that this will introduce an audible "click" at the beginning of each note. It's not much of a problem with harsh or percussive sounds, but it will become very audible on softer sounds. The higher the value, the slower the sound will fade in.
Dec defines decay, or how fast a sound will fade from its full volume down to the value found in Sus. By default it is set to 0C which will give you a sounds that fades is about 2-3 seconds.Shorter decay time will reach the sustain quicker while higher values will fade more slowly.
Sus is the volume at which the sound will be sustained after it's done with decay. By default it is set to 00 and if you leave it there the sound will die after decay. Moving this value up will sustain the sound indefinitely at the volume you select. The only way to stop the sound at this point is to trigger a new note in the same channel, or give it a release command.
Rel is the release portion of the envelope which acts pretty much the same way as the decay does. It will fade the volume from the value found in Sus, down to complete silence. The higher the value, the slower the fade. If you plan on using sustained sounds that you want to stop quickly, it is suggested to use a value of 01 instead of 00 for the same clicking reasons found with the attack portion of the envelope.
instrument effects
There are three instrument effects you can use to modify your sound in klystrack, the buzz which is inspired by the Atari ST's original YM2149 buzz envelopes, an oscillator sync, and a ring modulator. These three simple effect can turn the most basic waveform into a a whole new sound.
The Buzz is essentially a volume envelope effect. When you turn it on, you will thus lose the ability to apply the standard ADSR volume envelope to your sound. How this works is essentially just using separate oscillator as an envelope to quickly control the instrument's volume. In a way this is really similar to a ring modulator, but with its own source of modulation. This gives the impression of having two sounds playing simultaneously.
Detune will determine the pitch of this envelope/oscillator relative to your instrument's pitch. For example a pitch of +7 would use an oscillator that is pitched 7 semitones up from your Base instrument pitch. If you play a C, then the buzz would ring out on a G.
Shape will let you select between four different envelopes shapes: double saw up, double saw down, triangle up, and triangle down. All four will give you particular variations since the up/down variations determine whether your buzz envelope starts at full volume or a zero while the double saw and triangle sound different because a saw wave has a harsh amplitude jump from full to zero (or vice versa) while a triangle transitions smoothly between both.
The Fine setting can be use to adjust the pitch of the buzz envelope by minute amounts and will prove useful to bring sounds back in tune with other instruments when your buzz effect sends it a bit off.
The next two effects are grouped together because of the way they are used. Both are simply turned on or off, and a source for the modulation is then selected. The value in SRC represent which Channel will act as modulator. This is not always immediately obvious and can lead to some confusion. If your source is 00 for example, then when your instrument is played it will be synced or ring-modded by what ever is being played in channel 0 at that moment. Note that your modulators do not need to be audible, meaning that you can use instruments with the volume set to 00 in channel 00, and they will still modulate instruments with 00 as their modulation source. This enables you to dedicate a channel to modulation without having it blast awkward nonsensical sounds over your music. You can also press the arrow down from 00 to select FF as the source, which means that instead of using a channel as source, the sound will use itself as modulator.
Sync is a classic oscillator sync. What that means is that your instrument oscillator will play and loop normally until it gets reset by the cycle speed of your modulator's pitch. Sounds confusing? It kind of is. The end result is a harsh sound rich in harmonics. Both pitches from source and destination can be heard in the sound, but the source's pitch will be clearly dominant in most cases. Interesting sweeps can be achieved with the source's melody coming through your synced sound, and the higher the pitch of the synced oscillator, the thinner the metallic overtones.
Ring is a standard ring modulator, which is essentially another volume-based effect. It will use the source's amplitude to modify your instrument's volume. Classic ring modulators usually use simple waveforms like sinewaves as modulator because more complex waveforms tend to modulate your original sound into noise. Since klystrack uses a channel as a source, this means you will often find this effect to be noisy unless you carefully control what is being used as modulator.
filter
Each instrument in klystrack has its own multimode resonant filter. You can select between three types of filters and adjust the cutoff frequency and resonance. The filter is also entirely controllable from pattern effects, or straight in the instrument program.
LP selects the Low Pass Filter, which will only let the frequencies below the cutoff point play, everything above it will be cut from the sound. Useful to make sounds "darker".
HP selects the High Pass Filter, which will only let the frequencies aboce the cutoff point play, everything below it will be cut from the sound. Useful to thin out sounds that take up too much space in the low end.
BP selects the Band Pass Filter, which will only let a band of frequencies centered at the cutoff point play, everything that is too far from that central point is cut from the sound. Useful for "dark to thin" sweeps and limiting the frequencies where the sound sits in the mix.
Cut is the cutoff point where the filter's effect takes place. Values range from 000 to 7FF.
Res is the resonance of the filter, which means that frequencies directly at the cutoff point will be boosted a little. Values range from 0 to 4, with higher values meaning more gain at the cutoff point. This will make your filter less subtle and add a little "scream" at the cutoff frequencies. When using the filter to do sweeps, more resonance will make the sweep sound more pronounced.
extra settings
In this panel, you will find settings for the vibrato, pulse width modification, and FX bus. These settings, I assume, were added in later versions, hence the weird placement. Logically they should be grouped with the vibrato button and the pulse oscillator respectively, but hey...you wanted to use trackers.
FX will simply turn the effect send on or off. When it's on, instead of sending your sound straight to the output, it will instead send it to one the the four FX busses as indicated by the FX Bus option. In the next tutorial we will look at how to use these FX units.
Vib.S is the speed of your vibrato effect. Values range from 00 to FF, with 80 being the center. 00 to 7F will change the speed from slow to fast with a positive shape. 81 to FF will change the speed from fast to slow, with a negative shape. What that means is the shape of your vibrato will be inverted once you go past 80. For example if your Vib.Sh is set to a sine wave, 00-FF will first to UP in pitch before going back down, while 81-FF will first to DOWN in pitch before going back up. This is really only useful for the sine and square shapes, as the saw wave is already offered in both low-to-high and high-to-low shapes while the random shape will simply be unaffected since it's random. Note that the values used here are not in ticks, so syncing your vibrato effect to the tempo is only possible with approximation.
Vib.D is the depth of your vibrato, or how far from the original pitch of your sound will the effect go. Values go from 00 to FF, which translate to +0/-0 to +2/-2 semitones. For most musical purposes you will want to stay below 40 most of the time, with high values being used mostly for special effects.
Vib.Sh is the shape of the LFO used for the vibrato. Sine wave will go smoothly up and down, while the Saw will go from high to low and loop (reversed saw will obviously do the opposite). The Square wave shape will only play the maximum value of your Vib.D depth setting. For example if you were to set the depth at FF (2 semitones) and place a C, your vibrato would oscillator between A# and D, never playing anything in between. The last shape is Random, which will pick a new random pitch in the range of your Vib.D depth setting every time the LFO loops.
Vib.Del is the speed at which your vibrato will be gradually applied to your sound from nothing, up to the full depth chosen in Vib.D. Note that this setting is not linear and changes as you play with the depth of the vibrato. The higher your Vib.D is, the faster it is applied so you will need to add more Vib.Del If you want to keep the same delay time.
The next three settings are for the Pusle Width Modification. Rolls off your tongue doesn't it? In a nutshell, what PWM does is change the duty cycle of your Pulse oscillator (see oscillator section) over time. This gives a sweeping effect to your sound and is one of the staples of C64-era sounds. It's settings are very similar to the vibrato settings.
PWM.S is the speed of the Pulse Width Modification. Values range from 00 to FF and act the same way as with the vibrato speed, meaning that anything above 80 inverts the shape of the LFO.
PWM.D is the depth of the PWM. The PW setting in the oscillator section will act as the "center" for the PWM and the higher the value of PWM.D, the further away from this central point your PWM will move. Note that depending on your PW and PWM.D settings, it is possible for you to reach "outside" the normal range of the PW setting. If you go above 7FF, nothing bad will happen, the Pulse will simply stagnate at 7FF for as long as you are above it. If however you go below 010, your sound will be entirely cut off for as long as your are below 010. This is normally something to avoid, but it can definitely be used creatively for special effects.
PWN.SH is the shape of the LFO that will act as modifier. You have the same basic shapes here that you have in the vibrato section.
instrument program
Now this is the fun part. The program is where you go to create complex sounds that go beyond the simple beep. In a way, it is a kind of mini pattern, unique to each instrument, in which you put commands/effects to be executed one another the other. With it you can create arpeggios, filter sweeps, turn oscillators on and off and a whole lot more. For each instruement, the program has two settings, and a confusing column of obscure arcane wizard commands.
No Program Restart is a long and complicated way of saying "envelope trigger" and then have the option act the opposite of how it does on every synthesizer in history. Welcome to klystrack! If you turn this option on, then the program will run (and loop) independently from when the notes are played. By default this is off, which means that the program will restart from the top every time a new note is played with that instrument, which is generally much more useful.
P.Prd means Program Period, which is a fancy way to say how many ticks will each row be repeated for before moving on to the next. It's the exact same concept as the song's speed setting, and these two settings correlate very well too. For example if you have a speed of 06 and a P.Prd of 02, 03, 06, etc... then it is possible to create tempo-synced effects with the program.
In this program, all the standard pattern effect commands can be used, plus a few more reserved strictly for the program. I will not go over each effect you can use here as there are enough of them to justify dedicating an entire tutorial for them later but for the moment remember that the bottom bar act as a tooltip when you are editing the program so you should be able to figure out a lot of effects with experimentation. I will however give a few pointers on how to use the program properly, and deal with the Fxxx effects which are unique to it.
When you are in the Instrument Editor, the TAB key will move your edit cursor between the instrument settings, and the program panel. Since the keys are used to enter commands into the program, you cannot trigger notes while you are editing in the program panel. You will need to TAB out before you can use the keyboard to trigger notes.
If you press the spacebar on a row, you will link it with the row below it. What that means is that both of these rows will be executed at the same time. They are effectively treated as being the same row. There is no limit to how many rows you can link together, you could even have all 32 rows of the program be executed at the same time. Obviously, some commands will cancel each other out entirely, such as a portamento up and a portamento down of the same value. In the image above, you can see that the program uses four sets of two rows. Each of these set will execute a portamento down and filter cutoff down command at the same time.
The Insert key is used to add a row at your current position. It will shift everything underneath one row down. To remove a row from the program, select the row below the one you wish to delete, and press backspace. Everything from your selected row and below will be moved up one row. The delete key is used to delete a command from a row, without having anything underneath move up.
FFxx is the Goto command. When the program reaches this row, instead of playing the row, it will jump to whatever row is indicated with xx. In the above example, instead of playing row 08 the program will jump straight to row 00 again and continue playing the program. This creates an infinite loop and is one of the essential commands you will have to learn to fully work the program editor to its full capacity.
FD00 and FExx are loop commands. Each instrument can have as many loops as you can fit in the 32 rows you are given. FD00 marks the beginning of a loop. Since this is a command that doesn't affect the sound at all, it is often best used if you link it with another row so as not to introduce a one row delay in your program. The loop end command is FExx. When the program reaches an FExx command, it will go back to the last FD00 it encountered for as many times as you indicate in xx. For example FD00 at row 02, and FE04 at row 08 will loop from 02 to 08 four times. Note that "FE00" means an infinite loop and is a bit pointless because you could simply use the Goto command instead.
The last program command is FC00, which triggers the release. What the means is that you volume envelope will move to its release stage right away, no matter where you were in the envelope. This comes in handy when you have sounds that you wish to have sustained at a precise volume for a while, but you want them to end eventually without having to call a release command directly from the patterns. However, I do suggest you always trigger your releases from the patterns, it makes it much more clear for you where sounds start and where they begin in the patterns directly.
And there we go. That's about it for the instrument page. Now that you know what each option does, I encourage you to experiment. There is nothing better than the hands-on approach to learn stuff and no amount of reading up on a subject will replace just noodling around with the tools. Next time, we'll explore the FX page and what each option there means. After that we'll be done exploring the pages and we'll start with the real fun stuff, what the pattern effects are and how to use them, as well as how to program a few simple basic sounds.
Damn this was long to write. No doubt there's a lot of typos in there so please point them out to me by email if you spot any.
 |
| Classic ADSR, which of course means Advanced DungeonS and dRagons. |
Volume is pretty self explanatory. The default value is 80 and it can be adjusted from 00 to FF. It is good practice to keep your "full volume" sounds at 80 and not FF. That way if you need to bring softer instrument in front of the mix later, you'll have that much more headroom to achieve this.
The Relative button determines whether or not the volume and its envelope are absolute values or will be relative to the values in the volume and effect columns of your patterns. If it is left off, then entering a value of 40 in the volume column of your pattern will play the sound at an actual volume of 40. If Relative is turned on, then a value of 40 in the volume column would mean to trigger the sound at half the instrument's volume value. Remember from the last tutorial, the volume column values range from 00 (0% relative) to 80 (100% relative).
Atk determines the attack of the sound, which basically is how fast the sound will fade from nothing to its full volume. By default this is set to 01, which will pretty much play the sound instantaneously when a note is triggered. You can set it down to 00 for an even faster attack, but not that this will introduce an audible "click" at the beginning of each note. It's not much of a problem with harsh or percussive sounds, but it will become very audible on softer sounds. The higher the value, the slower the sound will fade in.
Dec defines decay, or how fast a sound will fade from its full volume down to the value found in Sus. By default it is set to 0C which will give you a sounds that fades is about 2-3 seconds.Shorter decay time will reach the sustain quicker while higher values will fade more slowly.
Sus is the volume at which the sound will be sustained after it's done with decay. By default it is set to 00 and if you leave it there the sound will die after decay. Moving this value up will sustain the sound indefinitely at the volume you select. The only way to stop the sound at this point is to trigger a new note in the same channel, or give it a release command.
Rel is the release portion of the envelope which acts pretty much the same way as the decay does. It will fade the volume from the value found in Sus, down to complete silence. The higher the value, the slower the fade. If you plan on using sustained sounds that you want to stop quickly, it is suggested to use a value of 01 instead of 00 for the same clicking reasons found with the attack portion of the envelope.
instrument effects
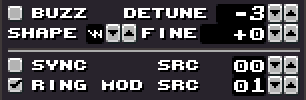 |
| As if chipmusic wasn't raw enough, this will mangle your sounds even more. |
The Buzz is essentially a volume envelope effect. When you turn it on, you will thus lose the ability to apply the standard ADSR volume envelope to your sound. How this works is essentially just using separate oscillator as an envelope to quickly control the instrument's volume. In a way this is really similar to a ring modulator, but with its own source of modulation. This gives the impression of having two sounds playing simultaneously.
Detune will determine the pitch of this envelope/oscillator relative to your instrument's pitch. For example a pitch of +7 would use an oscillator that is pitched 7 semitones up from your Base instrument pitch. If you play a C, then the buzz would ring out on a G.
Shape will let you select between four different envelopes shapes: double saw up, double saw down, triangle up, and triangle down. All four will give you particular variations since the up/down variations determine whether your buzz envelope starts at full volume or a zero while the double saw and triangle sound different because a saw wave has a harsh amplitude jump from full to zero (or vice versa) while a triangle transitions smoothly between both.
The Fine setting can be use to adjust the pitch of the buzz envelope by minute amounts and will prove useful to bring sounds back in tune with other instruments when your buzz effect sends it a bit off.
The next two effects are grouped together because of the way they are used. Both are simply turned on or off, and a source for the modulation is then selected. The value in SRC represent which Channel will act as modulator. This is not always immediately obvious and can lead to some confusion. If your source is 00 for example, then when your instrument is played it will be synced or ring-modded by what ever is being played in channel 0 at that moment. Note that your modulators do not need to be audible, meaning that you can use instruments with the volume set to 00 in channel 00, and they will still modulate instruments with 00 as their modulation source. This enables you to dedicate a channel to modulation without having it blast awkward nonsensical sounds over your music. You can also press the arrow down from 00 to select FF as the source, which means that instead of using a channel as source, the sound will use itself as modulator.
Sync is a classic oscillator sync. What that means is that your instrument oscillator will play and loop normally until it gets reset by the cycle speed of your modulator's pitch. Sounds confusing? It kind of is. The end result is a harsh sound rich in harmonics. Both pitches from source and destination can be heard in the sound, but the source's pitch will be clearly dominant in most cases. Interesting sweeps can be achieved with the source's melody coming through your synced sound, and the higher the pitch of the synced oscillator, the thinner the metallic overtones.
Ring is a standard ring modulator, which is essentially another volume-based effect. It will use the source's amplitude to modify your instrument's volume. Classic ring modulators usually use simple waveforms like sinewaves as modulator because more complex waveforms tend to modulate your original sound into noise. Since klystrack uses a channel as a source, this means you will often find this effect to be noisy unless you carefully control what is being used as modulator.
filter
 |
| Let the sweeps begin. |
LP selects the Low Pass Filter, which will only let the frequencies below the cutoff point play, everything above it will be cut from the sound. Useful to make sounds "darker".
HP selects the High Pass Filter, which will only let the frequencies aboce the cutoff point play, everything below it will be cut from the sound. Useful to thin out sounds that take up too much space in the low end.
BP selects the Band Pass Filter, which will only let a band of frequencies centered at the cutoff point play, everything that is too far from that central point is cut from the sound. Useful for "dark to thin" sweeps and limiting the frequencies where the sound sits in the mix.
Cut is the cutoff point where the filter's effect takes place. Values range from 000 to 7FF.
Res is the resonance of the filter, which means that frequencies directly at the cutoff point will be boosted a little. Values range from 0 to 4, with higher values meaning more gain at the cutoff point. This will make your filter less subtle and add a little "scream" at the cutoff frequencies. When using the filter to do sweeps, more resonance will make the sweep sound more pronounced.
extra settings
 |
| Using these will definitely make you more popular with the opposite sex. |
FX will simply turn the effect send on or off. When it's on, instead of sending your sound straight to the output, it will instead send it to one the the four FX busses as indicated by the FX Bus option. In the next tutorial we will look at how to use these FX units.
Vib.S is the speed of your vibrato effect. Values range from 00 to FF, with 80 being the center. 00 to 7F will change the speed from slow to fast with a positive shape. 81 to FF will change the speed from fast to slow, with a negative shape. What that means is the shape of your vibrato will be inverted once you go past 80. For example if your Vib.Sh is set to a sine wave, 00-FF will first to UP in pitch before going back down, while 81-FF will first to DOWN in pitch before going back up. This is really only useful for the sine and square shapes, as the saw wave is already offered in both low-to-high and high-to-low shapes while the random shape will simply be unaffected since it's random. Note that the values used here are not in ticks, so syncing your vibrato effect to the tempo is only possible with approximation.
Vib.D is the depth of your vibrato, or how far from the original pitch of your sound will the effect go. Values go from 00 to FF, which translate to +0/-0 to +2/-2 semitones. For most musical purposes you will want to stay below 40 most of the time, with high values being used mostly for special effects.
Vib.Sh is the shape of the LFO used for the vibrato. Sine wave will go smoothly up and down, while the Saw will go from high to low and loop (reversed saw will obviously do the opposite). The Square wave shape will only play the maximum value of your Vib.D depth setting. For example if you were to set the depth at FF (2 semitones) and place a C, your vibrato would oscillator between A# and D, never playing anything in between. The last shape is Random, which will pick a new random pitch in the range of your Vib.D depth setting every time the LFO loops.
Vib.Del is the speed at which your vibrato will be gradually applied to your sound from nothing, up to the full depth chosen in Vib.D. Note that this setting is not linear and changes as you play with the depth of the vibrato. The higher your Vib.D is, the faster it is applied so you will need to add more Vib.Del If you want to keep the same delay time.
The next three settings are for the Pusle Width Modification. Rolls off your tongue doesn't it? In a nutshell, what PWM does is change the duty cycle of your Pulse oscillator (see oscillator section) over time. This gives a sweeping effect to your sound and is one of the staples of C64-era sounds. It's settings are very similar to the vibrato settings.
PWM.S is the speed of the Pulse Width Modification. Values range from 00 to FF and act the same way as with the vibrato speed, meaning that anything above 80 inverts the shape of the LFO.
PWM.D is the depth of the PWM. The PW setting in the oscillator section will act as the "center" for the PWM and the higher the value of PWM.D, the further away from this central point your PWM will move. Note that depending on your PW and PWM.D settings, it is possible for you to reach "outside" the normal range of the PW setting. If you go above 7FF, nothing bad will happen, the Pulse will simply stagnate at 7FF for as long as you are above it. If however you go below 010, your sound will be entirely cut off for as long as your are below 010. This is normally something to avoid, but it can definitely be used creatively for special effects.
PWN.SH is the shape of the LFO that will act as modifier. You have the same basic shapes here that you have in the vibrato section.
instrument program
 |
| This will be confusing at first and needs to be toyed with to understand. |
No Program Restart is a long and complicated way of saying "envelope trigger" and then have the option act the opposite of how it does on every synthesizer in history. Welcome to klystrack! If you turn this option on, then the program will run (and loop) independently from when the notes are played. By default this is off, which means that the program will restart from the top every time a new note is played with that instrument, which is generally much more useful.
P.Prd means Program Period, which is a fancy way to say how many ticks will each row be repeated for before moving on to the next. It's the exact same concept as the song's speed setting, and these two settings correlate very well too. For example if you have a speed of 06 and a P.Prd of 02, 03, 06, etc... then it is possible to create tempo-synced effects with the program.
In this program, all the standard pattern effect commands can be used, plus a few more reserved strictly for the program. I will not go over each effect you can use here as there are enough of them to justify dedicating an entire tutorial for them later but for the moment remember that the bottom bar act as a tooltip when you are editing the program so you should be able to figure out a lot of effects with experimentation. I will however give a few pointers on how to use the program properly, and deal with the Fxxx effects which are unique to it.
When you are in the Instrument Editor, the TAB key will move your edit cursor between the instrument settings, and the program panel. Since the keys are used to enter commands into the program, you cannot trigger notes while you are editing in the program panel. You will need to TAB out before you can use the keyboard to trigger notes.
If you press the spacebar on a row, you will link it with the row below it. What that means is that both of these rows will be executed at the same time. They are effectively treated as being the same row. There is no limit to how many rows you can link together, you could even have all 32 rows of the program be executed at the same time. Obviously, some commands will cancel each other out entirely, such as a portamento up and a portamento down of the same value. In the image above, you can see that the program uses four sets of two rows. Each of these set will execute a portamento down and filter cutoff down command at the same time.
The Insert key is used to add a row at your current position. It will shift everything underneath one row down. To remove a row from the program, select the row below the one you wish to delete, and press backspace. Everything from your selected row and below will be moved up one row. The delete key is used to delete a command from a row, without having anything underneath move up.
FFxx is the Goto command. When the program reaches this row, instead of playing the row, it will jump to whatever row is indicated with xx. In the above example, instead of playing row 08 the program will jump straight to row 00 again and continue playing the program. This creates an infinite loop and is one of the essential commands you will have to learn to fully work the program editor to its full capacity.
FD00 and FExx are loop commands. Each instrument can have as many loops as you can fit in the 32 rows you are given. FD00 marks the beginning of a loop. Since this is a command that doesn't affect the sound at all, it is often best used if you link it with another row so as not to introduce a one row delay in your program. The loop end command is FExx. When the program reaches an FExx command, it will go back to the last FD00 it encountered for as many times as you indicate in xx. For example FD00 at row 02, and FE04 at row 08 will loop from 02 to 08 four times. Note that "FE00" means an infinite loop and is a bit pointless because you could simply use the Goto command instead.
The last program command is FC00, which triggers the release. What the means is that you volume envelope will move to its release stage right away, no matter where you were in the envelope. This comes in handy when you have sounds that you wish to have sustained at a precise volume for a while, but you want them to end eventually without having to call a release command directly from the patterns. However, I do suggest you always trigger your releases from the patterns, it makes it much more clear for you where sounds start and where they begin in the patterns directly.
And there we go. That's about it for the instrument page. Now that you know what each option does, I encourage you to experiment. There is nothing better than the hands-on approach to learn stuff and no amount of reading up on a subject will replace just noodling around with the tools. Next time, we'll explore the FX page and what each option there means. After that we'll be done exploring the pages and we'll start with the real fun stuff, what the pattern effects are and how to use them, as well as how to program a few simple basic sounds.
Damn this was long to write. No doubt there's a lot of typos in there so please point them out to me by email if you spot any.